General hints[]
- If you crouch in the shadows, with all personal light sources off, enemies will find it harder to spot you.
When you're hiding successfully, your screen will get a blue tint. - When you're crouching in the shadows and not moving, you can see in the dark.
When that happens, you will hear a short breathing noise, and the screen will warp slightly. - Don't Panic!
No, really, don't. When you're hiding somewhere, and an enemy passes you nearby, don't look right at it. When the enemy stays close and visible for too long, your character will panic and the enemy will spot you.
When this is about to happen, the screen starts shaking. - Rest when hurt.
If you are injured, and not in a hurry, stay in a safe place for a while, until your screen is not red anymore.
You can check if you're fully recoverd by opening your inventory screen.
Try to stay at full health, since you never know what's lurking behind the corner. - Apply physics.
Try to get used to the Newton Engine, and take advantage of it. Careful use of loose objects in the game world will often help you solve puzzles or stop enemies from attacking you. - Don't go Freeman on the mines.
It may be tempting to always have something ready to beat up anything that moves, but as long as you're carrying a weapon, you will not be able to interact with your environment (apart from beating on it). So something that can actually be moved around might appear static. This way you might miss some solutions to puzzles. - Spiders are scared of your flashlight
- Every time you touch an artifact, It creates a copy of you within it.
The Walkthrough[]
Prologue: Descent Into Darkness[]
Part 1: The Journey[]
The game starts out in your cabin aboard a fishing boat. Use the key from your inventory to open the padlock on the cabinet and pick up the glowstick and the batteries. Pick up the notebook from the table. Your flashlight is in the drawer next to the bed. In the chest near the bed you'll find a letter. After you took everything, you will hear a horn blowing, and you will get a message telling you to leave the cabin. Now you can walk through the door.
Part 2: Breaking The Ice[]
While you're walking through the blizzard, pick up a stone and carry it with you until you find a frozen hatch. Drop the stone onto it or throw it at the ice shell, turn the handle, pull the hatch open and go inside.
Part 3: Going In[]
This is the first time you hear strange whispers. Pick up a steel rod that lies next to the door on the left. There's a flare in the box nearby. The other door is closed. You'll find another flare behind the barrels to the right. Go through the open door and pick up the hammer and a flare on your left. Knock over the shelf and use the hammer to break the wooden planks. Crawl through the tunnel and take the first left route up. Walk into the room with a hatch on the floor. Insert the steel rod into the box with a hole in it and turn it to open the hatch. Go through it...
Chapter 1: The Fears Of Mine[]
Old Mine
Part 1: Spiders In The Night[]
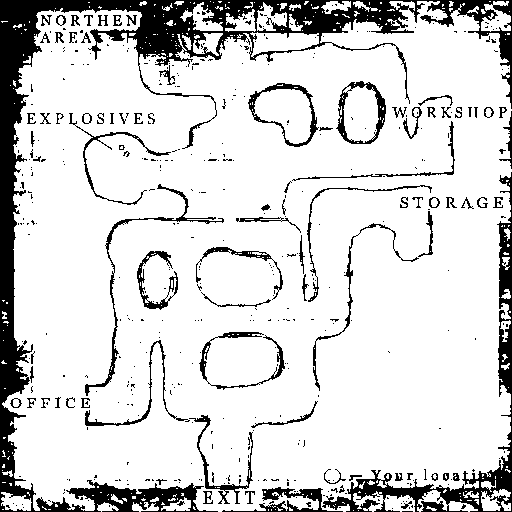
Walk forward until you see a map. Memorizing or printing it might be a good idea. Find the Storage area on the map and go there. After you entered the area, pick up the empty lighter from the shelf on the left. The center door and the door on the right are closed, so go through the door on the left. You enter a room with a box full of stones. Go through the door to the right and pick up painkillers and the batteries from the shelf. There you'll also find the first artifact, which you can use to save the game. Go back to the room with the box, take out all stones and move the box to uncover a trapdoor. Go down. You hear the creepy whispers again. Crouch to get into the tunnel and take the first route right. You see a mummified creature lying on the floor. Take the next turn right and pick up the note and a flare. Go back and take the first turn right. Watch out for the steam. Go left and pick up another note. Go back and then to the left. Keep walking until you approach a fence. Use the hammer to destroy the padlock. Pick up the fluid lighter gas and use it on the lighter in your inventory. Now you can use the lighter to light up the petroleum lamps in the main mine corridors. There are some batteries in the chest. Go back all the way to the place where you first turned right and turn right to pick up the ladder. Drag it to the place where you jumped down. You'll hear some VERY disturbing noises now. Attach the ladder to the hooks and go up. Go back to the main storage room. Two of the doors, that were previously locked, are now open. There are traces of blood on the floor. Go through the middle door and pick up the key and a note from the desk. In the small room directly accessible from this one you will find a piece of meat that Philip describes as looking like an animal's tongue and a dead spider on a desk. Go back and walk through the third door. There are two pieces of beef jerky in the drawer.
Part 2: A Dog's Life[]
Go back and get out of the Storage. You hear a dog coming, hide quickly and don't move! You can kill the dog later with the hammer. One way to do it is to get on a crate and hit it when it jumps you. If you get the timing right, direct combat would work too. Find the Office on the map and go there. There's beef jerky in the desk drawer on the right. From the desk with the artifact on it take the book and a bottle of Baxtrin, then open the drawer to find a key and a note. There are batteries in the cabinet. Use the key you found in the desk on the chest in the corner and take the book. There's beef jerky in the cabinet on the right and a flare on the left. Find the Workshop on the map. On your way to the workshop you'll come across a fence or wooden wall. Use the key you found in the storage area on the door in the fence and go in. The door will keep swinging open, so you should barricade it using barrels and stones, so the dog won't follow you. If you somehow get the dog's attention, it'll just shatter the door and the barrels though, so you should either keep away from the door or kill the dog, if that makes you feel safer.
Part 3: No Strings Attached[]
There's an arrow which says Explosives, go there. Take the TNT barrel, go back and take a left, then take another left and you'll see a caved-in tunnel. Take the note and drop the TNT barrel into the hole. The keycode to the actual workshop door is 8412 (it says so in the note you took). Go to the workshop and enter it. There's an artifact and a flare on the right shelf. On the left there's a box of cotton string. Take some of it. Go forward and move the stones to get the pickaxe. Go back and take the door on your left. Open the bars and use a hammer or the axe to smash the wooden planks on the left. Walk forward. There's a flare under the barrels. Pick up the box and go through a busted set of bars. There's an electric fence, so you'll have to find a way across. You can either use some planks to construct a ramp, or stack boxes to jump across. Smash the door with your pickaxe. There's a dynamite stick in the box, and painkillers on the right. Smash the barrel with your pickaxe. Combine the string and the bottle of Baxtrin in the inventory. Use the soaked string on the gun powder from the barrel. Now go back to the cave-in. Use the string (which is now a fuse) on the barrel, then use the lighter on the fuse and stay back!
Chapter 2: A Voice In The Dark[]
New Mine
Part 1: Let There Be Light[]
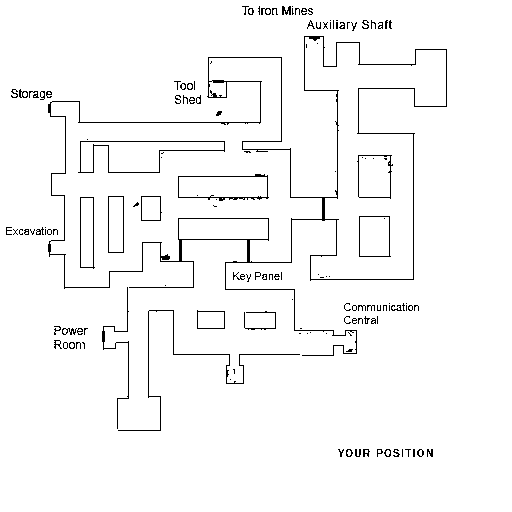
Walk forward and take the first route left to get to the Power room. There are two batteries, a note and an artifact on the shelf on the right side of the door. Use the pickaxe to smash the wooden planks guarding the big hole and push the box into the hole. Go down the ladder and pick up the battery that fell out of the box. Go back up. If you now look at the generator control panel you will see an empty battery compartment. Use the battery on this. Leave the Power room. Go left, then right and on the left you'll see a barrier, a closed fence and a keypad. There's a dog on the other side. Go forward and turn right as soon as possible. Walk through the door in front of you. In the room stack two boxes in front of the shelf with three boxes on it. Climb onto on the boxes and pick up a white fuse from the top shelf. ALternatively, you can use the broom to shove it down. From the other shelf pick up beef jerky, a flare and a note. Leave the room and go right. Enter the communication room. Pick up the radio from one table and a note from the other. You can hear beeping sounds from one of the radios. It's actually Morse Code for 5738. Go back to the Power room. On the control panel you will find five wheels. Each of them has a different symbol above it. These symbols are a Roman 1 (primary flow), a barely legible Roman 2 (secondary flow), horizontal waves (cooling), a drop (greasing), and vertical waves (steam valves). Accoording to the generator manual you found before, turn these wheels until their respective symbols light up, in the following order: secondary flow, cooling system, steam valves, greasing, primary flow. Then pull the lever next to the generator. A fuse will blow. Go back to the control panel and look for an open plating, where steam is rising. Use the fuse you found on the high shelf on that opening. Pull the lever again. The generator should start now.
Part 2: A Cave From Conversations Past[]
Leave the Power room and go to the fence. This is the first time you hear a man talking from the radio. Use the keypad and enter the code 5738. Kill the dog. Take a look at the map and walk through the door to the right. Turn left and kill the other dog. There is a fence blocked with a wooden plank to the right. Find the Tool shed on the map and go there. From the shelves pick up the saw, flare, batteries and a note. Find the Excavation site on the map and go there. Watch out for another dog. Walk through the tunnel. There's an artifact and a note on the table in the far left corner. You'll see a tunnel on the ceiling if you look up standing next to the knocked-over lamp.
Take the large part of the broken ladder, then jump and attach it to the hooks under the tunnel. Now jump and grab the ladder. Use a box to your advantage. Alternative, less acrobatic, solution: Push a box right next to the elevated rock platform, so it's almost directly beneath the tunnel. Now push another box onto the platform (this is possible at a low portion of the platform, close to the cave entrance). Push this box onto the one you positioned under the tunnel. Now attach the ladder to the ceiling hooks, jump onto the upper box and grab the ladder.
Enter the tunnel.
Part 3: A Tunnel From Times Ahead[]
If you take the first left you see a couple of eggs, from which deadly spiders will come out. Don't go there, or, if you feel up to it, try to smash the eggs and kill the spiders. But beware, they're difficult to hit. Go forward to the place with blood on the floor and then left. Crawl through the small tunnel and immediately use your lighter on the paraffin on the floor. Beware of the fire. Then move the rock from one hole to another to block the rest of the spiders. Go through the tunnel and grab a rock. Drop it into the green slime on the ground. Now you have to be quick, so better read ahead a bit before proceeding. If you start walking down the slope, a big rock will start rolling after you (Remember Indiana Jones?), so just run! Eventually, you will come across some wooden planks crossing a hole in the floor. If you smash these (after you walked across the hole on them), the rock will fall into that hole and stop rolling after you. At the bottom turn left, take out your axe and start smashing the wall. The spiders are after you. Run, smash and don't stop! Eventually you will fall down a tunnel and land in the Storage room, which was closed from the inside.
Part 4: Feeding The Beast[]
Behind you is a locker with painkillers. The door to the left is closed, take the door to your right. You pass a ventilation duct on the left, which you can smash, but we'll get back to that later. You enter a room with four shelves. There are two flares on the left one. Get out the way you came from and go right. You pass another ventilation duct. Go forward and you enter another room with shelves. You'll find a flare, batteries and beef jerky on one of them. On the right there's a green box hanging on the wall, in which you'll find a key you must take (approach the box from the right and move the cover to the left). Go back and smash the first ventilation shaft you see (on the right). Crouch and move forward. Smash another shaft in front of you. You enter a room with a box hanging from a crane. Go to the control room on the right. There's an artifact, so you can save your game. There's a book in one of the lockers. Now use the controls to move the box to the far left side of the room, so that when you jump on another box you will reach the ventilation shaft under the ceiling. The best way to do this might be to move the crane so the box hanging from the cable is hanging right next to the small platform, about half a box's height above ground, and push another one right next to it. After you reach and smash the duct cover move forward and don't fall down after you turn left. Keep crawling until you see another duct cover. Smash it and fall in the room. Pick up the gasoline canister. Watch out for the steam. Now leave the Storage area. Remember the door blocked with a wooden plank? It's near the place where you first walked into this part of the mine. Use the saw on the plank to cut it. Walk through the door. Go left and kill the dog. Head to the Auxiliary shaft. Before you take the last left there's a table and a note on it in front of you. Enter the Auxiliary shaft. Save the game using the artifact on the far left. Grab each end of the power cable and attach it to both sockets (the power cabinet and the table). Insert the key you found in the Storage into the hole on the table next to the joystick. In the inventory use the hammer on the gasoline canister to open it and then use the canister on the big digging machine. Use the key to start the machine and push the joystick up. The machine will dig through the wall and uncover a door on the right. You enter a new part of the mine…
Part 5: Hydraulics 101[]
Use the wooden planks to get to the other side without falling down. Turn right and approach the door. Now you will hear some noises and after a few seconds the door will be smashed by a huge worm. Run back and step on the planks. The worm will fall down. Walk into the room the worm just came out. The door on the left is closed. Go right through the tunnel. Take the first route left and kill two spiders. Destroy all eggs and spiders on the left. Go forward and turn left, there's a room. Pull the lever in front of you and run back to the room where the worm came from. The closed door is now open but slowly closing, so hurry. You enter a new part of the mine again…
Chapter 3: Heavy Industries[]
Iron Mine
Part 1: Davey Jones' Locker Room[]
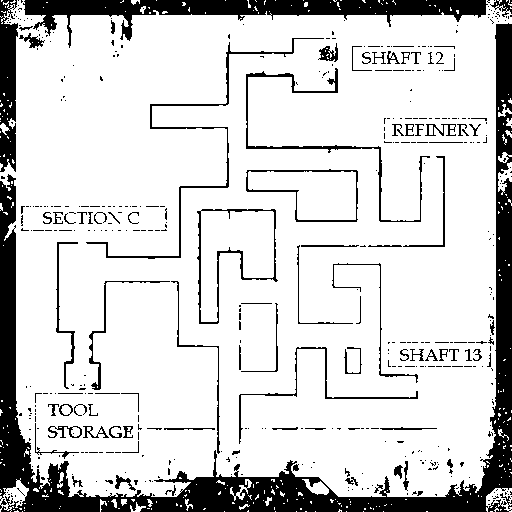
Go forward and take the first route to the left. There's a map on the wall. Go to Shaft 13 and kill the dog on your way. On the bridge turn right and enter the tunnel. It collapses after you walk in. Go forward and always stick to the left side. There is a lot of spiders and spider eggs, but you don't have to kill them all. Eventually you will enter a room with some lockers. Roll the big rock on the left to block the way you came from (spiders won't go in). There's a note on the bench. Pick up all things from the lockers. In one locker on the right there's a helmet under which there's a blank note you must take. Exit Shaft 13.
Part 2: Conveyance[]
Look at the map and go to the Tool storage. From there pick up a screwdriver and a bolt cutter. Opposite the Tool storage is Section C, but you don't know the code yet. Look at the map again and go to the Refinery. Kill the dog when you encounter it. In the Refinery go up the stairs on the left. Push the buttons until all three crushers are up. Crawl through the gap underneath them. Pick up some things from the little room on the right. Grab one rock and put it on the conveyor belt under the crushers. Follow it. Now put the rock on the conveyor belt that leads into a hole in the wall and go back to the other side. If you're quick enough, you'll see how the rock pushes down the ladder. Go up the ladder and push the button to the left. A conveyor belt at the bottom to the left of the crushers will be uncovered. Go to the little room under the ladder and pick up the spare motor. Drop it onto the uncovered belt. Go up the ladder and use the rock to block the fan so that it will eventually explode. Go through the duct. Put the motor that arrived on the tape into the space opposite the sign. Use the button and get on the conveyor belt.
Part 3: Steamrunner[]
Now you must cross the grids to the other side of the room without being killed by the steam. Each time the steam blows, some of the grids will remain steam-free. You can count them and find a safe route to the other side. Wait for a blowout before one of the center grids will be safe, and immediately after this steam pulse stops, jump onto that grid, wait the next blowout, and jump to the other side. After you successfully crossed the grids, move the barrels to uncover the shaft, because the door upstairs is closed. Smash the duct cover and crawl inside. Take the first route right and go a little way up. Use another duct to get out. You are now in Shaft 12 that was previously closed. Move the cart blocking the door, but don't go outside. Turn around and go down. Jump onto another cart and use the wire cutters to cut the chains blocking the cart. Push the cart down. The cart smashes a wall. Go through that hole.
Part 4: Bookworms[]
You enter a room that looks like a conference or research room. There is an artifact on a desk. In one of the shelves of the desk there's a newspaper you must take. Go to the closed door on the right and use the newspaper on the door to slide it through the gap near the floor. Then use the screwdriver to push the key out of the lock. It will fall down and land on the paper, so pull it back towards you and take the key. Enter the room. On the left there's a switch. Use it to turn on a UV lamp. Now use the blank note you picked up earlier to reveal the code (1371). Go back to Section C and enter the code at the security door…
Chapter 4: The Promise[]
Section C
Part 1: The Chase[]
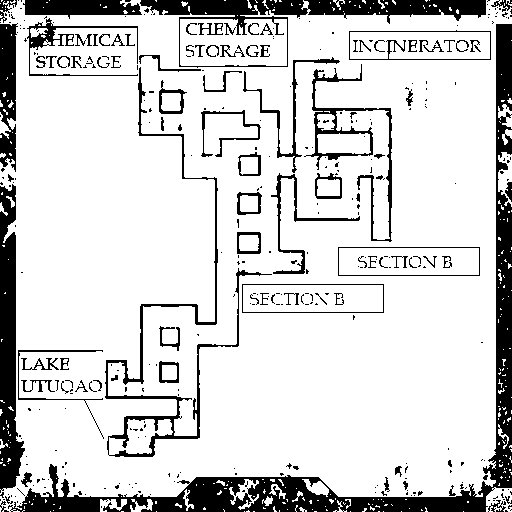
There's a map on the wall on the left. Go to the Chemical storage. Kill the dog on your way. Use the left door of the storage from the map, because the other one's closed. Walk inside. You might want to read ahead a bit, because you might not have enough time for this after you enter the room. Go forward and you'll see that something is smashing the door which you came from. It's that huge worm again. You must be very quick now: run through the first door and use the button on the left to close it and slow down the worm. Run right and jump through the green slime. Push another button on the right. Smash the wooden planks with your axe. Put two boxes in the green slime and jump to the other side. Smash the wooden column with your axe. You're safe now. Turn the valve to open the door and walk inside. Save the game using the artifact. In this room you must find six bottles containing some chemicals. They are hidden in several cupboards and corners of the room. On a table you should find a note with a list of chemicals, and a strange sentence (Badly Administered Dopamin Clouds Frequently Everything). This will help you identify the chemicals in the bottles. You'll also find flares and beef jerky. Use the door to leave this room.
Part 2: Forever Frozen[]
Find Lake Utuqaq on the map and go there. Go through the tunnel until you see two barrels, a backpack and a note. There are painkillers in the backpack. Save the game using the artifact on a table near the actual lake. You must now get to the far other end of the frozen lake. Be careful, because the ice will break if you walk too long on it. Walk slow and stop when the ice starts breaking. Then you can carefully walk across the floating pieces without any further risk. Alternatively, you can use wooden planks to cross it (smash the small shed to get them). After you manage to get to the other side you see a frozen hand holding a crowbar. Use your saw on the hand and pick up the crowbar. Go back over the lake and to the exit.
Part 3: A Scientist And Renegade[]
Now go to the Incinerator. Use the crowbar on the door and go inside. Turn left and use the wooden planks to cross the void and of course don't fall down. At the end open the door and go inside. There are painkillers on the right. Pick up a fuse from the desk's drawer. Pick up the glass vessel from the right table and use it on the tripod with a furnace underneath on the left table. Turn the valve on the gas tank between the tables. Use the lighter to light the furnace. From the inventory use the glass with the chemical marked D on the beaker on the tripod. Then use the chemical marked F. The mixture should "poof" and turn pink/bright purple. You've just created the "Death Mix" described in the book of explosives. Pick it up and carry it all the way back through the wooden planks. Remember that you're carrying explosive, so don't throw it anywhere and don't even think of touching anything with the vessel, it's highly volatile and will kill you instantly. After walking down the planks go left and put the explosive on the rocks (just move it near them, it will automatically slide into the right position). Use the fuse on it, light it and stay back! Go down the now revealed stairs…
Part 4: Flames Of Mercy[]
The doors on the left and center are locked, so go right. Open the next door and… you find Red. He's locked in the Incinerator. He will ask you to kill him by pushing the button on the right and turning on the Incinerator. There is no other way, you must push the button. After Red is cremated, look down and take the key out of the container. Go back and open the door on the left. This is his room. Look around. Use the artifact to save the game. Pass the door on the right and walk into another room. On the far right move the wardrobe to reveal a power box. Use the screwdriver to open it. Cut the wires with the bolt cutter, go back and use the crowbar on the center door… Pick up the note lying on the stairs and go down. Open the door, and turn right. You're in a long corridor, with locked doors on both sides. You see somebody far away. Walk towards that figure...